


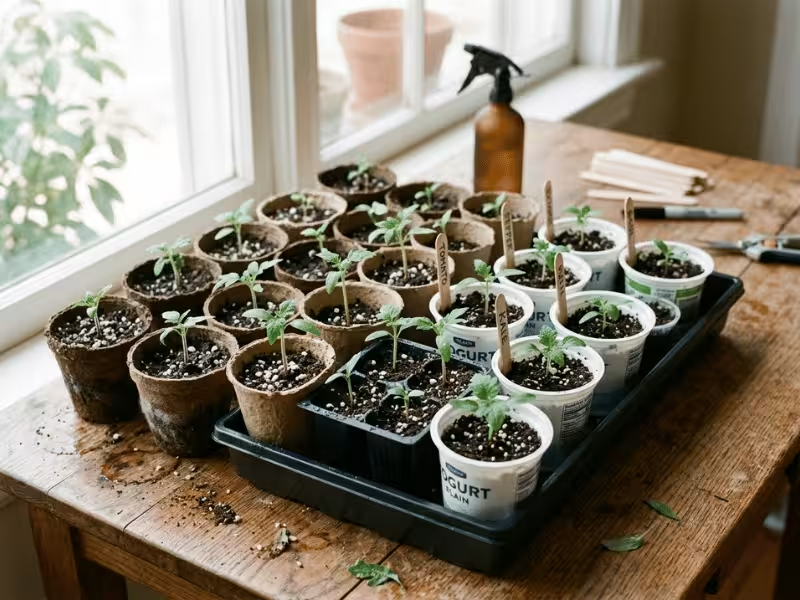
Many new growers spend weeks choosing the right seeds and then grab whatever cup is in the kitchen. That small choice often decides whether those seeds thrive or struggle.
Your seedling starter cup affects how fast seeds sprout and how much water stays near the roots. It shapes how roots grow, and it determines how easily a seedling moves into the garden.
Many weak seedlings can be traced back to the wrong container. This guide skips general seed-starting advice and focuses on the cup itself. You’ll learn:
- The main types of starter cups and how each one behaves
- How to match a cup to your space, budget, and crops
- How to sow, grow, and transplant without setbacks
- Which common mistakes to avoid
What Seedling Starter Cups Actually Do
A seedling starter cup is a small container that holds one plant from seed until it’s ready for a bigger pot or the garden. Most hold 2 to 4 inches of mix and have drainage holes in the bottom.
That one-plant, one-cup setup sets them apart. A seed tray, or flat, puts many seedlings in a shared bed of soil, so their roots tangle together. Direct sowing skips containers entirely, and seeds go straight into the garden bed. Starter cups sit in between. Each seedling gets its own space indoors, where you control the light, warmth, and water.
A starter cup does three jobs at once.
It manages moisture. The cup’s size, material, and drainage decide how long the mix stays damp. A thin peat pot can dry out in a day on a sunny sill. A cup with no holes can stay soggy for a week and rot the seed.
It shapes the roots. Roots keep growing until they hit a wall. In a cup that’s too small, they circle the bottom and form a tight knot. Seedlings with circled roots often stall after transplanting.
It decides how the move goes. Some cups let you slide the root ball out in one piece. Others go straight into the ground. A clean transfer means less stress and faster growth outdoors.
These three jobs explain why one cup works well for lettuce and poorly for tomatoes. The right choice depends on what you grow and how long it stays inside.
The Main Types of Seedling Starter Cups
Walk into any garden center in February, and you’ll find a whole wall of seed-starting containers. Most of them fall into four groups, and each handles water, roots, and transplanting in its own way.
Rather than covering every product on the shelf, this section explains how each type behaves once seeds go in, so you know what you’re signing up for.
Biodegradable Cups
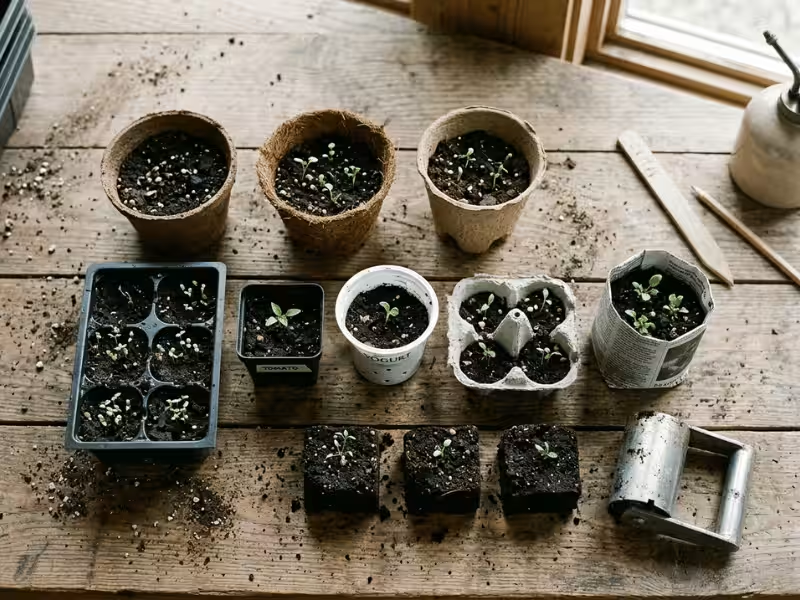
This group includes peat pots, coir (coconut fiber) pots, cow manure pots, and molded pulp cups. You plant the whole cup in the ground, and it slowly breaks down in the soil. These cups are one example of how biodegradable material options are replacing conventional plastic, from the garden shed to everyday packaging.
The big draw is gentle transplanting. You never pull roots out of a container, so fussy crops like cucumbers, squash, and melons settle in with less shock.
These cups do have quirks:
- They dry out fast. The walls soak up water from the mix. On a warm windowsill, a peat pot can go bone-dry in a day.
- They grow mold. White fuzz often shows up on damp walls. It’s usually harmless, but it signals poor airflow.
- They break down slowly. Thick-walled pots can sit in the soil for weeks and hold roots back.
Expect to pay about 15 to 40 cents per cup. Coir and pulp cost a bit more than peat.
Reusable Plastic Cups and Cell Inserts
For everyday seed starting, plastic remains the workhorse. This group covers 3- to 4-inch round pots and cell inserts, such as 6-cell or 72-cell packs that sit in a standard 10×20 tray.
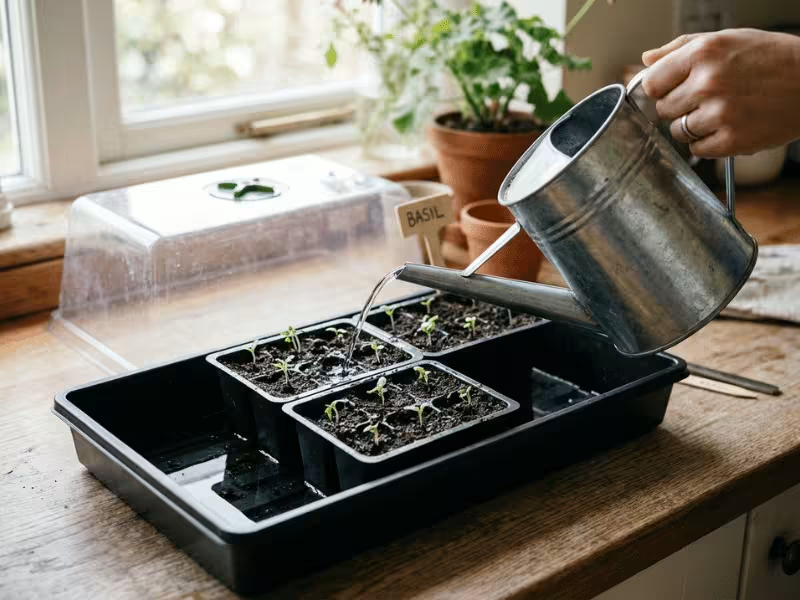
Plastic holds moisture evenly. The walls don’t pull water from the mix, so you water less often and get fewer surprises. Many sets come with a clear humidity dome that speeds up germination.
Thick plastic lasts five years or more with care. Before each season, wash the cups and soak them for 10 minutes in a solution of 1 part bleach to 9 parts water. That step helps prevent damping off.
There are downsides. Roots can circle the smooth walls if seedlings stay too long. Small 72-cell inserts suit lettuce well, but tomatoes outgrow them in about three weeks.
DIY and Recycled Options
You can start seeds in plenty of things you already own. They work, but each comes with limits.
- Yogurt cups make solid starter pots. Poke three or four holes in the bottom with a hot skewer.
- Egg cartons hold very little mix. Use them for fast crops, and move seedlings out within two to three weeks.
- Newspaper pots roll up in minutes with a glass or a wooden pot maker. Use plain black-ink pages and skip glossy inserts.
These options cost almost nothing. Just watch drainage closely.
Soil Blocks
Soil blocks skip the cup completely. You press damp seed-starting mix into firm cubes with a metal tool called a soil blocker.
The air around each block stops roots at the edge, a process known as “air pruning.” Roots branch out instead of circling, and seedlings transplant with almost no shock.
A good 2-inch blocker costs about $30 to $40 and lasts for years. The catch is a learning curve. You need a wetter, compost-rich mix, and blocks dry out quickly. Water them from below every day or two.
The Real Trade-Offs
Every type gives you something and asks for something back:
- Biodegradable cups make transplanting easy but demand close watering.
- Plastic offers steady moisture and years of use but needs cleaning and timely potting up.
- DIY cups save money but need careful drainage.
- Soil blocks grow the best roots but reward growers who check moisture daily.
Which Starter Cup Fits Your Situation Best?
There’s no single “best” starter cup. The right one depends on your space, your budget, and what you plan to grow. Find the situation below that sounds most like yours.
You want the easiest setup. Buy a 10×20 tray with a 6-cell insert and a clear humidity dome. Everything fits together. To water, pour about half an inch into the bottom tray and let the cells soak it up. It’s the closest thing to a foolproof kit.
You want the lowest cost. Use yogurt cups and newspaper pots, which cost almost nothing. Spend your money on a good bag of seed-starting mix instead, because the mix affects seedlings more than the cup does.
You want easier transplanting. Squash, cucumbers, and melons dislike root disturbance. Start them in pulp cups, coir pots, or soil blocks. Sow them only three to four weeks before your planting date so they don’t sit indoors too long.
You start many seedlings every year. Go with a soil blocker or heavy-duty plastic cell trays. Starting 50 seedlings a season in peat pots costs about $12 or more every spring. A $35 blocker pays for itself in about three seasons.
You only have a windowsill. Most sills offer just 4 to 6 inches of depth. Use small square plastic pots, because squares pack tighter than rounds. Skip peat pots here, since direct sun dries their walls out fast. Turn the cups every day, because seedlings lean toward the glass.
You grow tomatoes and peppers. These crops stay indoors six to eight weeks and grow deep roots. Start them in cells, then move them to 3- to 4-inch plastic pots once they show their first true leaves. Peppers grow slowly, so give them the full eight weeks.
You grow lettuce and herbs. These plants need only three to four weeks inside and keep shallow roots. A 72-cell insert works well. Egg cartons work too, as long as you transplant on time.
|
Situation |
Recommended Cup Type |
Why |
|---|---|---|
|
Easiest setup |
6-cell insert with tray and dome |
Simple bottom watering, steady moisture |
|
Lowest cost |
Yogurt cups or newspaper pots |
Nearly free, easy to make |
|
Easier transplanting |
Pulp cups, coir pots, or soil blocks |
Roots stay undisturbed |
|
Many seedlings yearly |
Soil blocker or heavy plastic cells |
Lasts for years, low cost per plant |
|
Windowsill only |
Small square plastic pots |
Fits narrow sills, won’t dry out fast |
|
Tomatoes and peppers |
Cells, then 3- to 4-inch pots |
Room for deep roots over 6 to 8 weeks |
|
Lettuce and herbs |
72-cell insert or egg carton |
Short indoor stay, shallow roots |
If two situations fit you, let your crop decide. A tomato in the wrong cup suffers more than you will in a slightly messier setup.
The Truth About Biodegradable Pots
Biodegradable pots sound like the perfect fix. You sow a seed, grow a seedling, and drop the whole pot into the ground. There’s no tugging, no torn roots, and less risk of transplant shock. For crops that sulk when their roots are touched, that promise is hard to resist.
In real gardens, results often fall short. A common complaint goes like this: “I planted them pot and all, and they just sat there for weeks.” When those seedlings are dug up, one of three problems usually shows up.
The rim acts like a wick. If even half an inch of pot sticks up above the soil, it pulls water out of the root zone and releases it into the air. On a sunny, breezy day, the mix inside can dry out while the bed around it stays damp.
The walls break down too slowly. Peat and thick pressed fiber can hold their shape for a month or more in cool spring soil. The roots stay boxed in just when the plant needs room to grow.
Roots can’t push through. Dry walls turn stiff and almost waterproof. It’s not unusual to pull up a peat pot in midsummer and find a tight knot of roots still trapped inside.
These pots still earn their place. They work best for crops that stay indoors only three to four weeks and dislike root disturbance, such as cucumbers, squash, melons, and pumpkins. Thin pulp or coir walls give roots the best chance.
Before planting, soak each pot for 10 minutes. Tear off the rim, and slit or peel away the bottom. Then bury the pot so no part shows above the soil line.
Choose plastic or soil blocks when seedlings stay inside six weeks or longer, as tomatoes and peppers do. Plastic also wins on sunny windowsills and for growers who can’t check moisture every day. In practice, a gentle slide out of a plastic cup often does less harm than a pot that never lets go.
How to Start Seeds in Starter Cups Indoors
Choosing the right cup gets you halfway there. The other half comes down to how you fill it, water it, and where you put it.
The four steps below each tie back to the cup, because that’s where most early problems start.
What You Need
Gather everything before you open a single seed packet:
- Starter cups with drainage holes in the bottom
- Seed-starting mix, not garden soil or chunky potting mix
- Seeds, plus the packets for depth and timing details
- Labels, such as plastic tags or wooden craft sticks
- A spray bottle for misting the surface
- A humidity dome or plastic wrap to hold in moisture
- A solid tray with no holes to hold the cups and catch water
Fill, Sow, and Label Correctly
- Pre-moisten the mix. Dry mix repels water, so stir in warm water until it feels like a wrung-out sponge. A squeezed handful should hold its shape without dripping.
- Fill loosely. Fill each cup to the top, then tap it on the table twice to settle the mix. Don’t press it down with your fingers. Packed mix squeezes out air, and young roots struggle to push through. Leave about 1/4 inch below the rim so water doesn’t spill over.
- Sow at the right depth. Plant each seed about twice as deep as it is wide. Tomato and pepper seeds go about 1/4 inch deep. Lettuce seeds need light to sprout, so press them onto the surface and leave them uncovered. Drop two or three seeds in each cup in case some fail.
- Label as you go. Write the crop, variety, and date on each cup. Young tomato and pepper seedlings look almost identical, and “I’ll label them later” rarely happens.
Water, Light, and Temperature
Water from the bottom. Pour about half an inch of water into the solid tray, wait 20 to 30 minutes, then pour off any extra. The mix soaks up moisture evenly, and seeds stay in place. Overhead watering can wash seeds out of shallow cups. Use the spray bottle only to mist the surface until sprouts appear.
Hold in humidity. Cover the cups with a dome or plastic wrap, and remove it once most cups show sprouts.
Keep the mix warm. Most vegetable seeds sprout best when the mix stays between 70°F and 80°F. Peppers prefer 80–85°F. Lettuce likes 60–70°F and can stall in warmer mix. In a cool apartment, a seedling heat mat makes a big difference.
Give plenty of light. Once sprouts appear, they need 14 to 16 hours of bright light a day. Even a south-facing window rarely provides that in early spring, so seedlings stretch and flop. Hang an LED grow light 2 to 4 inches above the tops, and run it on a timer.
Early Care After Germination
When the first true leaves appear, thin each cup to one seedling. Snip the extras at the soil line, because pulling them disturbs the keeper’s roots.
Run a small fan on low for a few hours each day. Moving air builds sturdy stems and dries the surface, which helps prevent damping off. Let the top 1/4 inch of mix dry out between waterings.
When Seedlings Outgrow Their Cups
Good early care pays off fast, and that brings a new challenge: seedlings start running out of room. From the third week on, check every cup once a week, because these signs show up quietly.
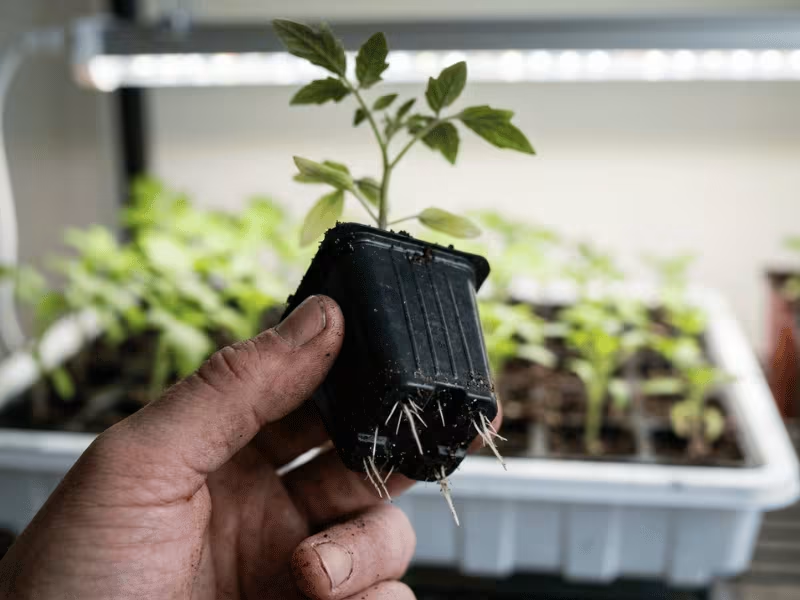
- Roots poke out of the drainage holes. Lift a cup and look underneath. White root tips mean the roots have already hit the walls and started to circle.
- The mix dries out in a day. A crowded root ball drinks water faster than the cup can hold it. If you water daily and the seedling still wilts by evening, it needs more space.
- True leaves keep stacking up. Two or three sets of true leaves usually mean the plant has filled a small cell.
- The top outgrows the cup. When a seedling stands about three times taller than its cup, or tips over when the mix dries, the roots can’t anchor it anymore.
If you spot two of these signs, act within a few days.
Your next step depends on the calendar. If your last frost date is two weeks or more away, pot up into a 3- to 4-inch container. Set tomatoes a little deeper than before so the buried stem can grow extra roots.
If planting day falls within a week or two, skip potting up. Start hardening off instead, and move seedlings outdoors on schedule.
Transplanting from Starter Cups Without Setbacks
Transplant day sets back more seedlings than any other day of the season. A plant that looked great on the shelf can wilt, turn purple, or stall for two weeks after a careless move.
The job breaks into three parts: toughen the plants, get them out of the cup cleanly, and set them at the right depth.
Harden Off Over 7 to 10 Days
Indoor seedlings have never felt wind, full sun, or a cold night. Hardening off lets them adjust a little each day.
- Days 1–2: Set them in a shaded, sheltered spot for 1 to 2 hours.
- Days 3–4: Extend it to 3 to 4 hours, with some morning sun.
- Days 5–7: Leave them out most of the day in full sun. Bring them in at night.
- Days 8–10: Leave them out overnight if lows stay above 50°F.
Check the cups twice a day, because small cups dry out fast in wind. If a cold or stormy day hits, keep them inside and pick up where you left off.
Get Them Out of the Cup Cleanly
Water each plastic cup an hour before planting. Moist roots hold the mix together.
Turn the cup upside down and slip two fingers around the stem. Squeeze the sides, or push up through the drainage hole with a pencil. The root ball should slide out whole. Never pull on the stem. If you need a handle, hold a leaf. A torn leaf grows back, but a crushed stem doesn’t.
For biodegradable cups, follow the prep steps above: soak, remove the rim, open the bottom, and set the pot so its top sits at least half an inch below the soil line. Any edge left above ground keeps pulling moisture from the roots all season.
Rescue Leggy or Root-Bound Seedlings
Tall, thin tomatoes have an easy fix. Bury them up to the first set of true leaves, or lay the stem sideways in a shallow trench and gently bend the top upright. Tomatoes grow new roots along the buried stem. Peppers and lettuce don’t, so plant them at their original depth.
Root-bound seedlings need a gentle touch. Tease the circled roots apart with your fingers, starting at the bottom. For a tight mat, make two or three shallow vertical cuts with a clean knife. This encourages new roots to grow outward into the soil.
Water every transplant right away. Plant on a cloudy afternoon or in the evening so seedlings get a night to settle before full sun.
Common Mistakes That Cause Weak Seedlings
Most weak seedlings don’t come from bad seeds. They come from small habits that seem harmless in March and show up as yellow leaves and thin stems in April.
These six mistakes come up most often, along with how to fix each one.
- Drowning seeds in cups that can’t drain. A cup without holes collects water at the bottom. Roots sit in it, run out of air, and rot. Even cups with holes fail when they sit in standing water all day. Give every cup at least three holes, and pour off tray water after 30 minutes. Before watering again, lift a cup. If it still feels heavy, wait a day.
- Filling cups with garden soil. Garden soil packs into a hard brick in a small cup. It drains poorly and often carries the fungi that cause damping off. Bagged potting mix isn’t much better, because bark chunks leave gaps that tiny roots can’t cross. Use a fine, sterile seed-starting mix instead.
- Starting too early. Early sowing feels like a head start, but it usually leaves you with leggy, root-bound plants waiting indoors for warm weather. Count back from your last frost date. Tomatoes need 6 to 8 weeks, peppers about 8, and lettuce, squash, and cucumbers just 3 to 4. If your last frost lands in mid-May, tomato seeds shouldn’t go in before mid-March.
- Skipping labels. Three weeks after sowing, a cherry tomato and a paste tomato look the same. So do most peppers. That’s how a hot pepper ends up where the sweet one belongs. Use a pencil or garden marker, since regular ink fades under water and grow lights.
- Leaving biodegradable rims above the soil. An exposed peat or coir rim wicks moisture away from the roots. Seedlings can wilt in a damp bed for this reason alone. Tear the rim off, or bury the pot completely.
- Leaving seedlings too long in tiny cups. A 72-cell insert holds only a couple of tablespoons of mix. That’s plenty for lettuce, but a tomato fills it in about three weeks. After that, roots circle, lower leaves yellow, and growth stalls. Pot up tomatoes and peppers once they show two sets of true leaves.
Fix these six habits, and your seedlings will head outdoors with thick stems and strong roots.
FAQs
Can you start seeds in regular cups from the kitchen?
Yes, as long as water can drain. Poke three or four holes in the bottom of each cup with a hot skewer or a small drill bit. Yogurt cups and 9-ounce plastic cups work well. Rinse them first, because leftover food residue can feed mold.
Skip glass, ceramic mugs, and anything you can’t puncture.
Do biodegradable pots really break down?
They do, but often more slowly than the label suggests. Thin pulp and coir pots usually soften within a few weeks in warm, moist soil. Thick peat pots can hold their shape for a month or longer in cool spring beds. Pots that dry out barely break down at all.
Soaking the pot, removing the rim, slitting the bottom, and burying it fully all help speed things up.
How big should starter cups be for tomatoes?
Start tomato seeds in small cells, about 1.5 to 2 inches wide, then move them into 3- to 4-inch pots once they show their first true leaves. That size gives roots enough room for the rest of their time indoors.
If you’d rather sow only once, start them directly in 3-inch pots. Water carefully, though. A large pot of wet mix around a tiny seedling stays soggy longer.
How long can seedlings stay in starter cups?
It depends on the cup size and the crop. In a 72-cell insert, lettuce and herbs do fine for three to four weeks, while tomatoes and peppers fill those cells in about three weeks.
In 3- to 4-inch pots, most vegetables can stay six to eight weeks. Roots poking out of drainage holes, mix that dries out every day, or yellowing lower leaves all mean it’s time to pot up or plant out.
Do seedlings need grow lights, or is a sunny window enough?
For most growers, a window falls short. Seedlings need 14 to 16 hours of bright light a day, and even a south-facing window in March gives far less. The result is seedlings that stretch, lean, and flop.
A basic LED shop light or grow light fixes this. Hang it 2 to 4 inches above the seedlings, raise it as they grow, and run it on a timer. If you rely on a window, stick with quick crops like lettuce, and turn the cups every day.
What is the best seed-starting mix for starter cups?
Choose a fine, sterile mix made from peat moss or coir and blended with perlite or vermiculite. It holds moisture, drains well, and lets tiny roots push through easily.
To make your own, combine equal parts coir, perlite, and vermiculite. Wet the mix before filling the cups, until it feels like a wrung-out sponge.
Can you reuse plastic seedling cups year after year?
Yes. Thick plastic pots and sturdy cell trays often last five years or more. Thin, flimsy inserts usually crack after one or two seasons.
Clean them before every use. Scrub off the old mix, soak the cups for 10 minutes in 1 part bleach to 9 parts water, then rinse well and let them dry. This kills the fungi that cause damping off. Store the cups out of direct sun, since UV light makes plastic brittle.
Start Small, Watch Closely, Then Scale Up
The cup you choose does more than hold soil. It controls how much moisture stays near the roots, shapes how those roots grow, and decides whether seedlings settle in fast or stall after transplanting.
You don’t need the newest pot or a big-name brand. Seedlings care about two things: holes that let water drain, and a sowing date that keeps them from outgrowing their cups. Get those right, and almost any cup type works.
Keep this spring simple. Pick one cup type that fits your space and crops, and sow a small batch of six to twelve seeds. Check them every few days by lifting each cup to feel its weight and looking at the drainage holes for roots. Once that batch thrives, you’ll know what to scale up.
If you’re sourcing eco-friendly materials for gardening, retail, or packaging applications, contact us to talk through the options that suit your needs.